
How to deploy a Autopilot device with MDT with out collection the hardware hash – Mobile-First Cloud-First
Window Autopilot is getting better and better with every release of Microsoft Intune and Windows 10 build. The latest is that we can put a Autopilot payload down on the device before the OOBE and then make it a Autopilot device without collection the hardware hash for older devices or get the information from the OEM or reseller.
Back in October 2015 when I did my first Azure AD joined deployment in a public school, that was before Windows Autopilot but we had some of the same issue that we have today, one question was do we use the OEM image already on the device or do we use a custom image, at that time there was no good way of getting Office 365 click to run installed on the devices after they was Azure AD joined – so we went with a custom image deployed with MDT – see my blog post on who we did it here – today we can just deploy the Office 365 as an application directly from Intune in a nice and easy way.
Today we got Windows Autopilot and will love to use that – but have a similar issue, we have already deployed Windows devices deployed in a on-prem Active Directory and what to confirm them into a cloud managed device with Azure AD joined and Intune management – but there is no easy way of doing that. But with Windows 10 1809 we can deploy a Autopilot payload to the device before the OOBE and it will be a Autopilot device with all the advances it gets. So the outline of this blog post is:
- Deploy a custom updated image to a existent Windows device with MDT
- Download the Autopilot payload
- Get the device syspreped and rebooted
- Cleanup after MDT
- Deliver the device Autopilot enabled to the end user without having to collect the hardware hash and upload it to the Autopilot service
Prerequisite:
- Windows 10 1809 or later
- Azure AD P1 or P2 (A1 for Education – part of Intune for Education)
- Microsoft Intune
- Already created a Autopilot profile in Intune
- Azure AD or Azure AD preview powershell module
- Already have a MDT deployment solution up and running
How to get the Windows Autopilot payload:
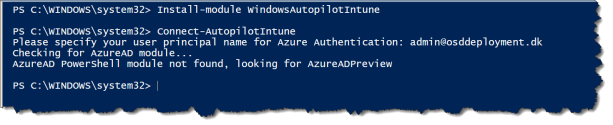
We have to install the new WindowsAutopilotIntune powershell module
Install-module WindowsAutopilotIntune

Connect to Autopilot Intune – with your Azure AD admin
Connect-AutopilotIntune
Run the command to get the Intune Autopilot profile and convert it to .json
Get-Autopilotprofile | ConvertTo-AutopilotconfigurationJSON

Then you can copy the content of the Autopilot profile to notepad and save as AutopilotConfigurationFile.json
Note: I had issue getting the AutopilotConfigurationFile.json working after copied the content to notepad – after ensuring that “CloudAssignedAadServerData” was in one line in the file every thing worked as a charm!
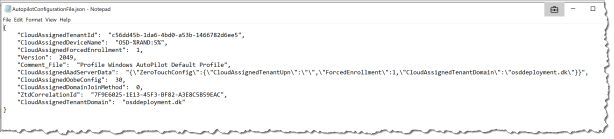
Note: remember to save as ANSI
Now we have the AutopilotConfigurationFile.json and are ready to create the MDT task Sequence.
How to customize the MDT Task Sequence for Autopilot:
In my case I use the MDT deployment share to other deployment as well as the Windows Autopilot deployment – so I will use a customsettings.ini from a task sequence
You need to create a standard deployment MDT task sequence then you can start make the changes to get it working for Autopilot deployment.
In my case I adds 5 steps into a standard MDT task Sequence:
- Set a new Customsettings.ini (optional)
- Apply the AutopilotConfigurationFile.json to the new device
- Run a MDT cleanup script
- Copy a SetupComplete.cmd to run some post cleanup after MDT
- Run sysprep so that the device will end up in OOBE for the end user
1 : Set a new Customsettings.ini (optional)
First create your CustomeSettings_Autopilot.ini file – the one I use can be downloaded from here the file needs to be stored in your MDT deployment share under the Control folder.
In my case the important is that the device is not getting domain joined but ends up in a workgroup

Now change the MDT task Sequence to use your custom CustomSettings_Autopilot.ini
- Disable or delete the step “Gather local only” create a new “Gather local only” step
- Change to “Gather local data and process rules” with the rules file : CustomSettings_Autopilot.ini

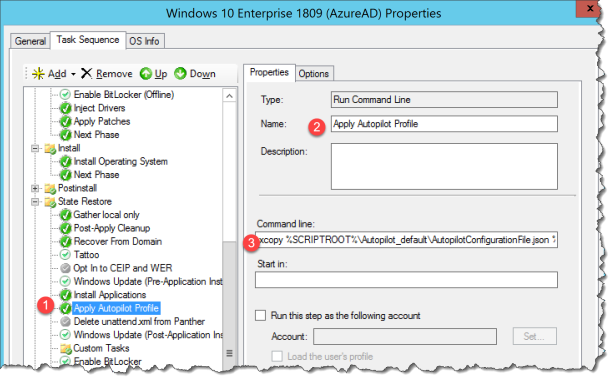
2 : Apply the AutopilotConfigurationFile.json to the new device
Create a step in the section “State restore” to get the AutopilotConfigurationFile.json onto the new installed Windows 10 1809 or later – in my case I have created a folder in the MDT Deployment Share under scripts with my custom scripts.
Now change the MDT task Sequence to copy your previous created AutopilotConfigurationFile.json
- Create a step “Run Command Line”
- Change the Name : to Apply Autipilot Profile
- Enter the Command line : xcopy %SCRIPTROOT%\Autopilot_default\AutopilotConfigurationFile.json %SystemRoot%\provisioning\AutoPilot\ /c
3 : Run a MDT cleanup script
Do to I break the MDT task sequence with a sysprep I need to run a cleanup script – I have created my own that you can get here

Now change the MDT task Sequence to use your MDT_Cleanup.ps1
- Create a step that run PowerShell Script
- Enter a name : MDT Cleanup
- Enter the Command line : %SCRIPTROOT%\Autopilot_default\MDT_Cleanup.ps1

4 : Copy a SetupComplete.cmd to run some post cleanup after MDT
You need to create a SetupComplete.cmd script to clean up the last from MDT, the one I use can be downloaded from here

This script runs immediately after the user sees the desktop. This setting is disabled when using OEM product keys. It runs with local system permission.
Now change the MDT task Sequence to use your SetupComplete.cmd
- Create a step that run Command Line
- Enter a name : Copy Setup Complete
- Enter the Command line : xcopy %SCRIPTROOT%\Autopilot_default\SetupComplete.cmd %WINDIR%\Setup\Scripts\ /c

5 : Run sysprep so that the device will end up in OOBE for the end user
You need to run sysprep.exe in order to get the OOBE for Autopilot to the end user
- Create a step to Run Command Line
- Enter a name: Run Sysprep
- Run the command line: %SystemRoot%\system32\sysprep\sysprep.exe /oobe /quiet /reboot

Now you are ready to deploy Windows 10 1809 with MDT to a device that have not been Autopilot enabled and it will startup as a Autopilot device
What is the end user experience:
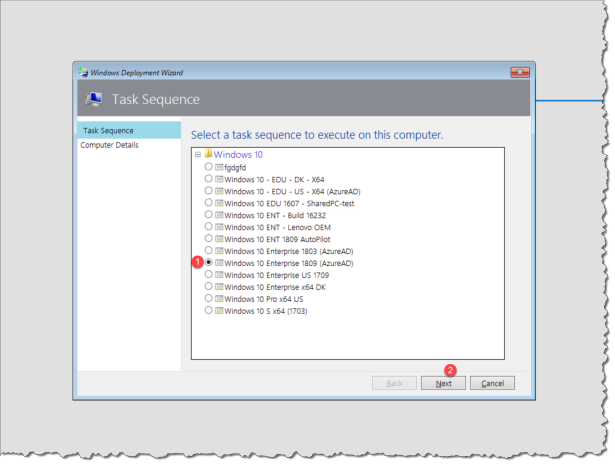
When you boot up into your MDT deployment share you will get a menu of all your MDT task Sequences – if you have not automated this step
- Select the Task Sequence with the Autopilot modifications
- Click Next
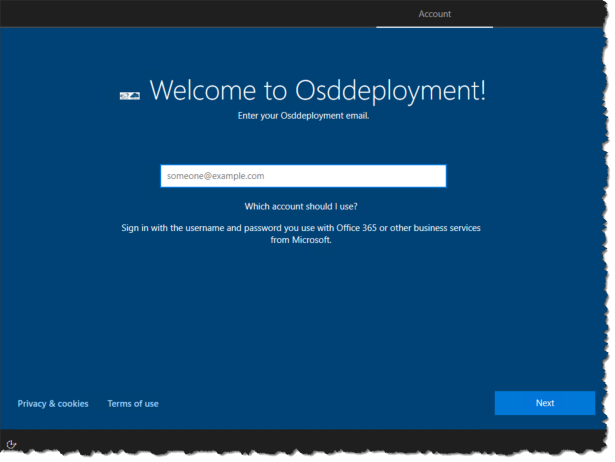
After the OS Deployment and sysprep of the device, the next three screens is the region and keyboard part of the OOBE – then the end user can enter there user name.
Happy testing!
Read more:
Upgrade Windows 7 using Windows Autopilot in Configuration Manager
New Windows Autopilot capabilities and expanded partner support simplify modern device deployment
Windows Autopilot for existing devices
![Windows-Hello-For-Business-Active-Directory[1]](https://maciejrebisz.com/wp-content/uploads/2025/08/Windows-Hello-For-Business-Active-Directory1-1024x576-65x65.png "Windows-Hello-For-Business-Active-Directory[1]")
![B-Intune-Graphic[1]](https://maciejrebisz.com/wp-content/uploads/2025/08/B-Intune-Graphic1-1024x603-65x65.png "B-Intune-Graphic[1]")
![wp-1593849019379[1]](https://maciejrebisz.com/wp-content/uploads/2025/08/wp-15938490193791-65x65.jpg "wp-1593849019379[1]")